
Dopo una lunga pausa ho ripreso a lavorare alla casetta Del Prado. Una parte della struttura ha iniziato ad imbarcarsi e ci sono diverse cose che, con l’esperienza acquisita nel tempo, ora avrei fatto diversamente. Ma ho deciso che voglio terminarla. Questa in fondo è la mia palestra.
After a long break I started to work at the Del Prado dollhouse again. A part of the structure has already begun to warp. Besides that, I don’t like some works I did at the beginning. Now I gained experience and I would build several things differently. But I decided to end this project. This is a good training after all.

via A LITTLE BIT OF EVERYTHING
Già da tempo avevo fatto alcune modifiche alla versione originale. Avevo diviso il bagno, creando la lavanderia.
Mentre in cucina avevo eliminato la parte sottostante del camino. Non ho una foto mia del camino originale, così ho scelto quella della cucina di A little Bit of Everything per mostrarvela.
I already made some changes to the original version of the dollhouse. I divided the bathroom, adding a laundry room.
In the kitchen I removed the lower part of the fireplace. I don’t have a photo of this first version. So I chose picture from A little Bit of Everything‘s kitchen to show you the original shape of the fireplace.

cucinare nel medioevo – via wikipedia
La storia del camino inizia poco dopo la scoperta del fuoco da parte dell’uomo. Questo elemento così importante per la preparazione dei cibi, per riscaldare gli ambienti e per l’illuminazione, era al tempo stesso terribilmente pericoloso e distruttivo. Per questo motivo le fiamme dovevano essere custodite e confinate, affinché non incendiassero le abitazioni.
Per molti secoli il focolare era stato allestito al centro della stanza, lontano dalle pareti costruite principalmente di legno, ed il fumo lasciato salire liberamente e fatto uscire da un foro nel tetto. Sul fuoco si cucinava, mentre il calore riscaldava l’ambiente circostante.
Nel Medioevo si iniziò, soprattutto nelle città, a costruire case in pietra. Il focolare fu così addossato al muro e venne aggiunta una cappa. Questa era piuttosto sporgente e spesso era sorretta da colonne. Raccoglieva i fumi e li convogliava verso l’esterno tramite la canna fumaria. Si trattava di manufatti ingombranti e pesanti. Per poter costruire camini anche ai piani superiori e poter così riscaldare anche le camere da letto, si dovette studiare un modello più piccolo e poco profondo, in parte incassato nel muro. Questo tipo di camino è arrivato ai tempi nostri.
The history of the fireplace begins shortly after the discovery of fire by humans. This element, which is so important for cooking, heating and lighting, was at the same time terribly dangerous and destructive. For this reason the flames had to be maintained and confined, so that they did not burn the houses.
For many centuries the hearth was set up in the center of the room, away from the wooden wall. The smoke rose freely and came out from a hole in the roof. The fire was used for the food preparation, while it heated up the surrounding environment.
In the Middle Ages people began to build stone houses, especially in the cities. Thus the hearth was placed against the wall and a hood was added. This was quite protruding and was often supported by columns. It collected the fumes, which were conveyed to the outside through a chimney. Fireplaces were rather bulky and heavy. In order to build them also on the upper floors and heat the bedrooms, a smaller and shallower model, partly built into the wall, was invented. This type of fireplace is still used nowadays.

cucina del ‘600 – by Joseph Heintz il Giovane, via http://www.ibcmultimedia.it
Fu nel basso Medioevo che si cominciò ad utilizzare una stanza apposita e separata per la preparazione dei cibi, la cucina.
In the late Middle Ages people began to use a separate room for food preparation and cooking, the kitchen.

girarrosto ad aria calda, su disegno di Leonardo da Vinci – via hevelius.it
Una curiosità: Leonardo da Vinci aveva inventato un girarrosto automatico. Lo spiedo era sistemato sopra le braci del camino ed era collegato ad un’elica inserita nella canna fumaria. Con il passaggio dell’aria calda, essa roteava e faceva girare il girarrosto. In questo modo lo spiedo si muoveva automaticamente, senza l’intervento dell’uomo.
A curiosity: Leonardo da Vinci invented an automatic rotisserie. The spit was placed over the embers of the fireplace and it was connected to a propeller inserted in the chimney. The hot air flow made it rotate and it spun the rotisserie. In this way the spit turned automatically, without human intervention.

Kitchen in Museum Van Loon in Amsterdam – via wikipedia
Pensando alle cucine d’altri tempi, mi erano tornate alla mente le mantovane che ingentiliscono la cappa del camino.
Thinking of vintage kitchens from the past, I remembered the embroidered pelmets decorating old chimney hoods.

In merceria ho quindi acquistato un nastrino di cotone con gli smerli blu, il colore della mia cucina. Di solito li si usa per rifinire i collettini delle camicie dei bambini. Io invece l’ho incollato ai bordi della mensola della cappa, lungo tutti e tre i lati liberi.
I bought a cotton scalloped ribbon at the haberdashery. Usually it’s used to finish the collars of children’s shirts. I chose one with a blue profile to match the color of my kitchen and I glued it to the border of the shelf that surrounds the hood.
 In corrispondenza degli angoli ho praticato un taglietto nel margine da incollare, facendo attenzione a non tagliare troppo. Questo agevola la curvatura a 90 gradi del nastro.
Nonostante questo abbellimento, c’era comunque qualcosa che non mi soddisfaceva a pieno. Le piastrelle che rivestivano la cappa non si armonizzavano con il resto.
At the corners I cut a slit into the ribbon’s seam allowance, being careful not to trim too much. This allows the ribbon to turn easily at 90 degrees.
Despite this embellishment, there was still something that didn’t fully satisfy me. I didn’t like the tiles on the hood.

hammered copper surface texture with patina – via amazon.com
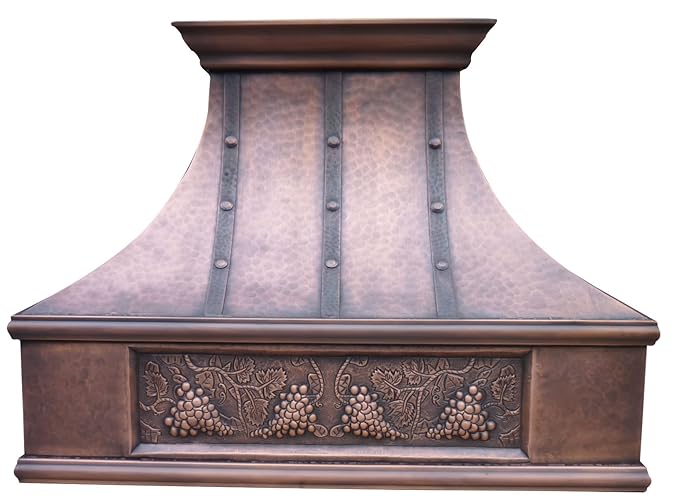
Quindi ho cercato ispirazione in internet ed ho trovato delle cappe in rame. Hanno un sapore antico. Mi ricordano le vecchie rosticcerie con le grandi cappe di rame sotto le quali girano i polli sui girarrosti.
So I looked for inspiration on the internet and found some copper hoods. They remind me of old delis where chickens turn on rotisseries under big copper hoods.

different copper hood styles via wishihadthat.com
Il rame è uno dei primi metalli usati dall’uomo. Allo stato puro è morbido. All’inizio fu quindi utilizzato per creare soprattutto oggetti decorativi. Intorno al 4.000 aC venne inventato il bronzo, una lega di rame e stagno. Il metallo ottenuto era più duro e poteva essere forgiato o fuso per creare vasi, contenitori e armi come frecce e arpioni.
Gli antichi Egizi avevano scoperto le proprietà battericide e funghicide del rame e lo usavano per sterilizzare ferite e rendere potabile l’acqua. Realizzavano anche specchi. Proprio per la brillantezza e bellezza di questo materiale, esso venne associato alla dea Venere. Gli antichi Romani lo usarono come moneta. Passarono poi all’ottone, una lega di rame e zinco, che impiegarono anche per la realizzazione di armature, strumenti musicali e manufatti artistici. Essi usarono il rame anche per le tubature dei loro ingegnosi sistemi idrici.
Nell’era moderna il rame fu impiegato per la copertura dei tetti. La richiesta di rame crebbe notevolmente con l’avvento dell’elettricità. I cavi elettrici sono infatti prodotti con questo metallo.
Copper is one of the first metals used by humans. As it’s very soft, it was used to make decorative items. Around 4.000 BC bronze was invented. It’s an alloy of copper and tin. This harder metal could be forged or casted for creating pots, containers and weapons like arrows and harpoons.
Egyptians discovered that copper had bactericidal and fungicidal properties. They used it to sterilize wounds and to make water drinkable. They made also mirrors with copper. Due to its brilliance and beauty this metal was associated to the goddess Venus. The Romans used it for their coins. Later thy made them out of brass, an alloy of copper and zinc. They used this metal for armors, musical instruments and artistic objects. They also made copper tubing for their ingenious plumbing systems.
In the modern era, copper was additionally used for roofing. The demand for copper grew considerably in the Age of Electricity, as electric wires are made with this metal.

In Svizzera avevo acquistato dei fogli d’alluminio in colori assortiti, tra i quali anche il rame. Si usano principalmente per realizzare decorazioni natalizie, ma sapevo che prima o poi mi sarebbero servite per la casa delle bambole.
In Switzerland I purchased aluminum foils in assorted colors, including copper. They are mainly used for Christmas decorations or embossing. But I knew that sooner or later I would have needed them for the dollhouse.

Per prendere le misure esatte ho creato una dima. Ho appoggiato un foglio di carta sulla cappa ed ho seguito perfettamente ogni piega ed ogni margine, calcandoli bene con l’unghia. Nei punti dove la carta non era sufficiente ho aggiunto dei pezzi tenendoli insieme con del nastro adesivo.
To take the exact measurements, I made a template. I placed a sheet of paper on the hood. Then I pressed each fold and each edge with my fingernail. Where the paper wasn’t enough, I added some pieces and held them with tape together.

Così ho ottenuto la sagoma della cappa. Una volta distesa, l’ho appoggiata su un nuovo foglio di carta ed ho ricopiato la forma.
So I got the shape of the hood. Once unfolded, I placed it on a new sheet of paper and copied the shape.

Poi ho sistemato la sagoma di carta sul foglio di rame. Con la riga di metallo ed il cutter ho tagliato lungo tutti i lati.
Then I placed the paper template on the copper sheet. With a metal ruler and the cutter I cut along all sides.

Per ottenere un angolo della lamiera perfettamente diritto su tutta la sua lunghezza, serve una guida, che abbia uno spigolo vivo e che sia più lunga della lamiera da piegare.
Io ho usato il mio Geodreieck grande. L’ho appoggiato nel punto dove volevo fare la piega della cappa e tenendolo pressato con la mano sinistra ho bloccato un lato del lamierino contro il tavolo. Con la mano destra ho sollevato con delicatezza il lembo libero, imprimendo l’angolo.
To make nice straight corners, I folded the metal sheet using a sharp edge as a guide. It has to be longer than the sheet to be bent.
I used my big Geodreieck. I placed it where I wanted to fold the hood. Keeping one side of the foil pressed under the ruler, stuck against the table, I raised carefully the free end, marking the corner.

Geodreieck – via wikipedia
Il Geodreieck è uno strumento di misurazione, utilizzato principalmente in geometria, che combina il righello ed il goniometro. Si trova difficilmente in Italia, ma è uno strumento fantastico. Serve per misurare gli angoli, per tracciare linee e per disegnare agevolmente rette parallele e perpendicolari. Altra caratteristica, che trovo molto utile, è il posizionamento dello zero al centro della riga. Lo uso spesso per segnare contemporaneamente le misure di due pezzi paralleli o per stabilire il centro di una retta o tracciare una linea centrale.
E’ realizzata in materiale plastico trasparente ed in commercio ne esistono di diverse dimensioni. La più comune è quella piccola nella foto qui sopra, il cui righello misura 14 cm, ma ne esistono anche di più grandi. Quella che attualmente sto usando io, misura 20 cm.
Io uso il Geodreieck dai tempi della scuola. E’ così comodo che mi serve anche per segnare gli orli ai pantaloni!
The Geodreieck is a measuring instrument, mainly used in geometry. It combines a ruler with a protractor. Even it’s a fantastic tool, it’s difficult to find in Italy. It’s used to measure angles, to draw lines and to easily trace parallel and perpendicular lines. Another feature, which I find very useful, is the zero positioned at the center of the ruler. I often use it to mark the measurements of two parallel pieces at the same time or to establish the center of a straight line or to draw a central line.
It’s made of transparent plastic and is available in different sizes. The most common is the small one shown in the picture above. The ruler measures 14 cm. But there are also larger ones. The one I am currently using is 20 cm long.
I have been using the Geodreieck since school. It’s such a useful tool that I use it also to mark the hems of pants, when I have to shorten them!

ribattino
Una particolarità delle cappe di rame sono i listelli di giunzione con i caratteristici ribattini.
The joining strips with the characteristic rivets are a peculiarity of the copper hoods.

Per realizzare il rigonfiamento dei ribattini ed imitare i rivetti, ho utilizzato lo strumento con la punta a sfera, che si usa per modellare la pasta polimerica o l’argilla.
Ho ottenuto buoni risultati e punti ben definiti quando ho lavorato sul tappetino da taglio, piuttosto che su una superficie cedevole.
I made bulges to imitate the rivets, using a ball stylus tool for clay sculpting.
I achieved good results and well definded dots when I worked on the cutting mat, rather than on a soft surface.

Per una cappa grande come la mia servono 2 listelli di giunzione da applicare sul davanti e 2 per gli angoli. Ho quindi tagliato delle strisce lunghe quanto l’altezza della cappa. 2 strisce sono larghe 3 mm e 2 sono larghe il doppio, ovvero 6 mm.
Le strisce più larghe devono essere piegate a circa 90 gradi con la stessa tecnica usata per piegare la cappa. La piegatura va effettuata prima d’imprimere le forme dei rivetti, così da non rovinarli. Ho tenuto una metà bloccata sotto la riga. L’altra metà è però troppo stretta per essere tenuta con le dita. Pertanto ho infilato sotto il lembo libero un secondo righello e l’ho fatto ruotare, sollevando la lamina ed imprimendo una piega netta.
Poi ho impresso sul retro di ogni striscia una fila di punti ad una distanza regolare, aiutandomi con il righello. I i ribattini di tutte i listelli di giunzione vanno posizionati alla stessa altezza, facendo attenzione che il primo e l’ultimo ribattino non siano troppo vicini al margine dell’inizio e dalla fine delle strisce di rame.
For a hood as large as mine, you need 2 joining strips for the front and 2 for the corners. I cut 4 strips a little bit longer than the height of the hood. 2 strips were 3 mm wide and 2 were twice the width, namely 6 mm.
I bent the wider strips at about 90 degrees with the same technique I used to fold the hood. This step should be done before the rivets are embossed, in order not to damage them. I kept one half of the strip pressed below the ruler. As the other half is too narrow and the fingers can’t hold it, I slipped a second ruler under the free flap and lifted the foil with a rotating movement and obtaining a sharp fold.
Then I embossed a row of dots on the back of each strip. Using the ruler I placed them in the center at a regular distance one from the other. The rivets should be at the same height on all junction strips and start and end not too close to the edge of the beginning and the end of the copper strips.

Ho iniziato ad applicare alla cappa le strisce di giunzione che vanno agli angoli. Per incollarle ho utilizzato la colla vinilica. L’ho stesa omogeneamente su tutto il retro, avendo cura di coprire bene tutti i margini. Le strisce devono infatti aderire perfettamente alla cappa e non sollevarsi in nessun punto. Ho eliminato subito le eventuali sbavature di colla con un panno umido. Con delicatezza ho premuto le strisce contro la cappa, senza però passare sui rivetti, altrimenti li avrei schiacciati.
La cappa, sebbene arricchita dalle giunzioni ed i ribattini, aveva ancora un aspetto troppo semplice. Ho quindi cercato in rete quali tipi di decorazioni potessi aggiungere.
I started with the junction strips for the corners of the hood. I spread out the vinyl glue evenly over the entire back side, taking care to cover all the edges. The strips must adhere perfectly to the hood and not lift up at any point. I immediately removed any glue smudge with a damp cloth. I gently pressed the strips against the hood, without passing over the rivets, otherwise I would have flattened them.
Despite the addition of joints and rivets, the hood still looked too simple. So I searched the web for supplementary decorations.

uva
uva
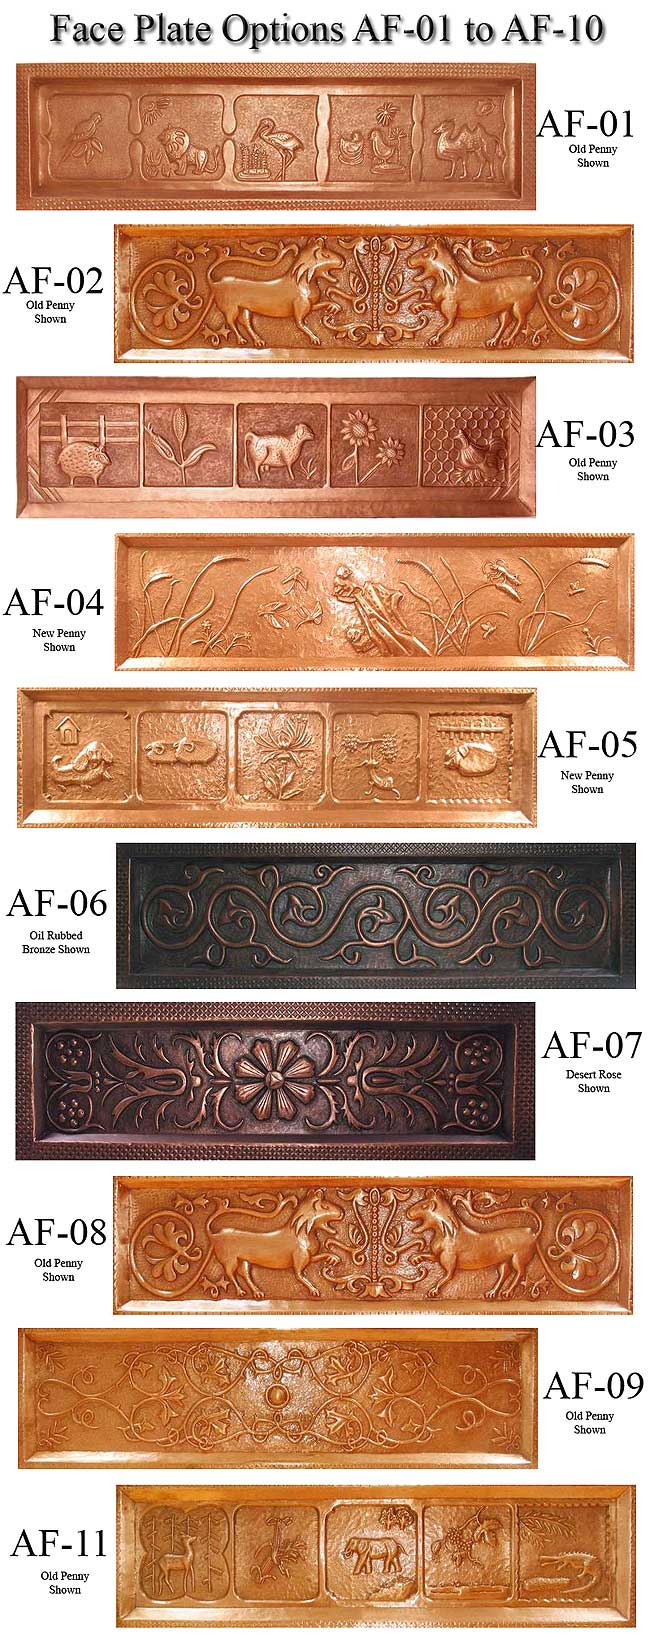
bordi a sbalzo
Mi sono così imbattuta in una serie di decori a sbalzo. Esistono con tantissimi motivi diversi: ghirigori floreali, animali, tralci di uva…
So I came across a series of embossed decorations. There are many different motifs: floral doodles, animals, grape vines …

Ho ritagliato una striscia di rame alta 17 mm e più larga della base della cappa. Appoggiandola contro la cappa, ho segnato l’andamento delle svasature ai lati ed ho tagliato i bordi di conseguenza.
Ho optato per i rami di vite con uva, che mi parevano molto decorativi ed al tempo stesso facili da realizzare. Con l’attrezzo a punta rotonda ho tracciato i segni sul retro del bordo di rame. Partendo dal centro, ho impresso in modo speculare e simmetrico il segno dei rami curvi con i riccioli. Ho aggiunto poi i grappoli ed infine ho riempito gli spazi rimanenti con le foglie.
I cut a strip of copper 17 mm high and wider than the base of the hood. I placed the strip against the base and marked the flared sides. Then I cut them accordingly.
I opted for grapevine branches with grapes. It’s a highly decorative designs and seemed to be quite easy to make. Using the tool with the round tip I worked on the back side of the foil. I first traced the branches with curls, starting from the center and working in a specular and symmetrical way. Then I added the grapes and finally filled the rest of the space with the leaves.

Al termine ho applicato il bordo con la colla vinilica, usando le stesse accortezze avute per i giunti con i rivetti .
When the embossing was finished, I pasted the strip on the hood with vinyl glue, as I did with the joints with the rivets.

Ho poi incollato le strisce di giunzione sul davanti della cappa, accorciandole prima, di modo che i rivetti fossero tutti allineati. Infine ho incollato la cappa di rame sopra a quella di piastrelle. Ora l’aspetto è molto più realistico, ma il lavoro non è terminato, manca la parte sottostante.
Then I glued the junction strips to the front of the hood, shortening them first so that the rivets were all aligned. At the end I glued the copper hood over the tiled one. Now the hood looks much more realistic, but it’s not finished, the part below is missing.

L’altro giorno ho fatto un sondaggio su Instagram ed è risultato che i miei lettori preferiscono più post brevi, che uno solo lungo.
Vi do quindi appuntamento a tra due settimane con il proseguimento: i piedritti.
The other day I made a survey on my Instagram. It turned out that my readers prefer several short posts, rather than just a long one.
So see you in two weeks with the continuation: the piers.


Very Informative! Appreciated!
"Mi piace"Piace a 1 persona
Thank you! 😊
"Mi piace""Mi piace"
Once again, your research and your project are in perfect harmony! I am Really enjoying this post! 😀
"Mi piace"Piace a 1 persona
Thank you Elizabeth! You are keen reader😊
"Mi piace""Mi piace"
Beau début, l’aluminium coloré a un bel aspect cuivre, j’attends la suite de la cheminée.
Je préfère aussi des posts découpés en 2 ou 3.
"Mi piace"Piace a 1 persona
Merci Joc! Oui, je vai fair plusieurs post à l’avenir
"Mi piace""Mi piace"
Preciosa chimenea, me encanta el aspecto que le da el cobre y el grabado que has hecho!!
Un beso
"Mi piace"Piace a 1 persona
Grazie Matxalen! 😊
"Mi piace""Mi piace"
Ersilia, it looks fantastic! You’re already further with your kitchen than I am. I moved the cooker hood so it stands over a corner and I’m also thinking of taking the bottom part away, it closes up the stove too much. I love your idea of a copper top!
Short posts are lovely because one can dip into them often. But every once in a while a long post is OK too. I will look forward to your next instalment.
"Mi piace"Piace a 1 persona
Thank you Megan! Next post will be about the piers 😉
"Mi piace""Mi piace"
Splendido lavoro 😍
Bacio
Sid
"Mi piace"Piace a 1 persona
Grazie Sid! 💕
"Mi piace""Mi piace"
Pingback: Il camino della cucina 3, la base – The kitchen fireplace 3, the base | Dada's dollhouse