
 La seconda parte della realizzazione del nostro specchio da comò consiste nel creare lo specchio stesso con la sua cornice e di fissarlo a due colonnine laterali, che poggiano sulla base appena costruita. Le spiegazioni per creare la base le trovate qui.
The second part of the construction of our shaving mirror includes the making of the mirror itself with its frame and the fastening to the side columns, which are fixed on the base that we just built. The explanations to create the base can be found here.
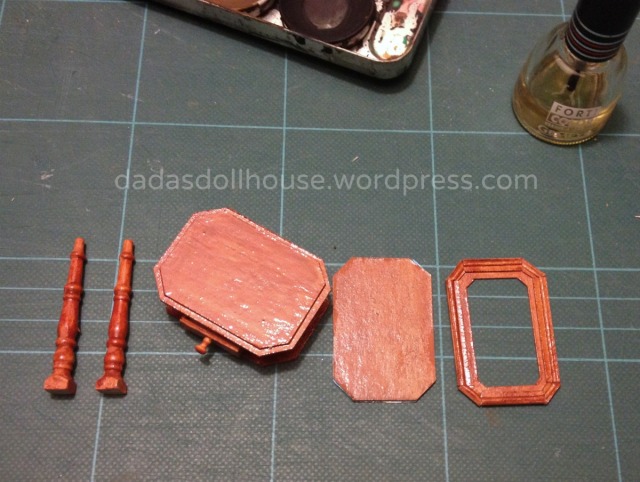
 Le colonnine che reggono lo specchio sono state realizzate con due gambe da tavolo di legno tornite. Le abbiamo accorciate a 5 cm.
The columns that hold up the mirror are made with two wooden turned table legs. We shortened them to 5 cm.

Per lo specchio servono due ottagoni grandi uguali, uno di spessore semplice, per la cornice, ed uno doppio, per il fondo. Essi sono ricavati dal cartoncino riciclato delle scatole dei cereali.
Non possiamo fornirvi la larghezza di questi pezzi, perché dipende dallo spessore delle colonnine ed in commercio ve ne sono di diversi tipi. Vi spieghiamo dunque come ottenere la larghezza (A). Questa misura si calcola misurando il top della base (C) sulla quale poggieranno le colonnine e sottraendo poi lo spessore massimo* delle due colonnine (B) e 1 mm di “aria” (D) su ogni lato per permettere allo specchio di oscillare.
A = C – (2 x B) – (2 x D)
Se inseriamo nella formula le nostre misure otteniamo che la cornice con lo specchio deve essere larga 3 cm.
A = 4,8 cm – (2 x 0,8 cm) – (2 x 0,1 cm)
A = 3 cm
* Lo spessore del piedistallo alla base della colonnina dovrebbe essere ininfluente, in quanto lo specchio nella parte bassa è svasato. Vi suggeriamo però, prima di procedere con l’assemblaggio, di fare una prova, affiancando i singoli pezzi e verificando che non vi siano punti che possano ostacolare il movimento e che le colonne appoggino completamente sulla base, senza sporgere.
Fore the mirror we needed two identical octagons. One for the bottom is double layered and the other for the frame is simple and has only one layer. They were made from the recycled cardboard of the cereal boxes.
We are not able to give you the width of these pieces, as it depends from the thickness of the columns and there are so many different types of turned legs that you might choose. So here we explain you how to calculate the width (A). First you have to measure the top of the base (C) on which the columns will stay. Then you have to subtract the maximum* thickness of the two columns (B) and 1 mm (D) space on each side to allow the mirror to swing.
A = C – (2 x B) – (2 x D)
If we enter our sizes into the formula, we get that our frame is 3 cm wide.
A = 4.8 cm – (2 x 0.8 cm) – (2 x 0.1 cm)
A = 3 cm
*The thickness of the column’s pedestal should be irrelevant, since the mirror in the lower part is flared. We suggest, however, before proceeding with the assembly, to do a test, aligning all the pieces and making sure there are no points that might hinder the movement and that the columns stay on the base without protruding.

I nostri due rettangoli per lo specchio misurano 4,5 cm x 3 cm cadauno. I triangoli da eliminare agli angoli hanno un lato che misura 0,6 cm dalla punta.
L’ottagono che è destinato al fondo e che ha uno spessore doppio serve in un secondo tempo. Per questo lo abbiamo messo da parte ed abbiamo iniziato a lavorare l’altro, che è per la cornice ed è di cartoncino semplice. Ad esso abbiamo eliminato la parte centrale, lasciando Un bordo di 0,6 cm.
Abbiamo poi ritagliato la cornicetta per rifinire il bordo della cornice. Anche questa è stata ricavata dalla piega della scatola. Questa volta abbiamo voluto ottenere un profilo leggermente diverso. Su un lato abbiamo tagliato a filo della bombatura e sull’altro abbiamo lasciato un bordo piatto di 1 mm.
Our two rectangles for the mirror measure 4.5 cm x 3 cm each. The triangles to be eliminated on the corners have a side measuring 0.6 cm from the tip.
One of the two octagons is twice as thick and is for the bottom. So we put it aside for a later use and started to work on the other piece, which is made of one layer only and is for the frame. We removed the central part leaving a border of 0.6 cm.
Then we cut the molding for the frame. Also this strip is made from the crease of a recycled cereal box. But this time it has a slightly different profile. On one side we cut next to the bulge and on the other we left a flat edge of 1 mm.

Abbiamo tagliato la cornicetta in segmenti e li abbiamo incollati a filo del bordo esterno. In corrispondenza delle giunture bisogna fare attenzione che i profili combacino in modo corretto.
We cut the molding into segments and we glued them flush to the outer edge. The profiles at the joints must be aligned and fit accordingly.

Il profilo sagomato, incollato sulla cornice crea un effetto tridimensionale.
The molding glued on the frame creates a tridimensional effect.

Come superficie riflettente bisogna scegliere un materiale che sia leggero e non appesantisca lo specchio e che al tempo stesso abbia una bella superficie riflettente. Noi abbiamo utilizzato un pezzetto di pellicola argentata che avevamo in casa. Si tratta di un campione di un materiale che si applica sulle vetrate per mitigare l’effetto dei raggi solari.
Nel kit Del Prado gli specchi sono degli adesivi argentati e la loro superficie non è veramente riflettente. A nostro parere le caratteristiche indispensabili dovrebbero essere la leggerezza, l’essere perfettamente specchiante ed il poterlo tagliare facilmente. Voi avete qualche materiale da suggerire?
For the reflective surface of the mirror, we chose a light material that doesn’t add weight to the mirror frame. At the same time it should have a beautiful reflective surface. We used a piece of silver foil we had at home. It is a sample of a special material that once applied to the window it mitigates the solar rays’ effect.
The fake mirrors supplied with the Del Prado kit are silvery stickers and their surface is not really reflective. In our opinion it should be light, perfectly reflecting and easy to cut. Do you have some alternative material to suggest?

Abbiamo incollato la pellicola a specchio all’ottagono che funge da fondo. Poi l’abbiamo rifilata tutta attorno.
Per evitare che si increspi, abbiamo steso la colla solo in prossimità del bordo. Purtroppo se la pellicola viene incollata completamente al cartone tutte le imperfezioni del fondo diventano visibili. Infatti il cartoncino non è un materiale perfettamente liscio, ma leggermente poroso.
Le nostre prove con Vinavil e Bostik non hanno dato buoni risultati. Le vostre esperienze con questi materiali come sono? C’è forse una colla particolare che si potrebbe usare? Un vostro consiglio anche a questo riguardo mi farebbe piacere!
Prima d’incollare la cornice al fondo dello specchio, abbiamo dipinto i pezzi, così non abbiamo dovuto mascherare lo specchio per proteggerlo dal colore.
We glued the mirrored foil to the octagon of the bottom. Then we trimmed the foil flush with the outer shape.
To prevent it from wrinkling, we spread the glue only near to the edges. Unfortunately, when we glued the foil completely to the cardboard, all the imperfections of the bottom become visible. In fact the cardboard is not a perfectly smooth material, but rather porous.
Our attempts with PVA glue and Bostik weren’t satisfactory. How are your experiences with these materials? Is there a special glue that we could use? I would really appreciate your advice also on this matter!
Before we glued the frame to the bottom of the mirror, we painted the pieces separately, so we had not to protect the mirror.

Sebbene nella seconda metà dell’ottocento si usassero tonalità scure, abbiamo optato per un legno chiaro, come il ciliegio. Gli specchi basculanti sono infatti meno recenti. Probabilmente questa piccola specchiera è un pezzo di famiglia.
Il ciliegio è una pianta da frutto, ornamentale per la sua meravigliosa fioritura e da legname. Proviene originariamente dall’Oriente. Fin dal Rinascimento viene usato per gli intarsi. Grazie alla sua pesantezza e la facile lavorabilità, esso si utilizzava anche per la realizzazione di mobili. E’ un’essenza molto pregiata, di media durezza, a grana fine e compatta e di colore chiaro rossiccio. Tende ad imbarcarsi e viene facilmente attaccata dai tarli.
In the second half of the nineteenth century darker woods were more common. The tilting mirrors were more ancient, so we chose a light colored essence, the cherry wood. This shaving mirror was probably a family heirloom.
The cherry tree bears fruit, it is an ornamental plant for its spectacular flowering and is an appreciated timber tree. It comes from the Orient. Since the Renaissance, is was used for the inlays. Thanks to its heaviness and good workability it was also used for the construction of furniture. It is an exquisite essence, medium hard, smooth fine-grained, compact and light reddish-brown. It tends to warp and is easily attacked by termites.
Per ottenere il colore del ciliegio con gli acquerelli, abbiamo applicato due diverse tonalità, un arancio ed un marrone medio. Le abbiamo stese in modo non omogeneo per imitare le venature del legno.
Il cartoncino tende ad assorbire l’acqua dell’acquarello, causando l’eventuale scollamento e/o l’imbarcatura dei pezzi. Pertanto bisogna applicare il colore senza bagnare troppo la superficie. Soprattutto le prime pennellate devono essere piuttosto “asciutte” e bisogna lasciare asciugare bene le varie mani di colore. Una volta dipinti i pezzi, può essere utile mettere quelli piatti ad asciugare sotto un peso. Alcuni libri vanno bene, purché il peso sia distribuito omogeneamente. Per assorbire l’umidità è necessario interporre due fogli di carta pulita.
E’ importante dipingere tutti i pezzi nello stesso momento, così tutti gli elementi hanno la stessa tinta.
In order to obtain the color of cherry wood we used watercolors. We applied two different colors, an orange and a medium brown. We spread them out unevenly to imitate the wood grain.
Cardboard tends to absorb the water of the watercolor and the pieces may eventually unglue and/or warp. Therefore, we had to apply the colors without wetting too much the surfaces. Especially the first strokes must not be to watery and each coat has to dry completely. Once painted it may be useful to leave the flat pieces dry under a weight. Some books are fine, as long as the weight is evenly distributed. The pieces should be placed between two sheets of clean paper, in order to absorb the moisture.
It’s important to paint all the pieces at the same time, so that all the parts get the same color shade.
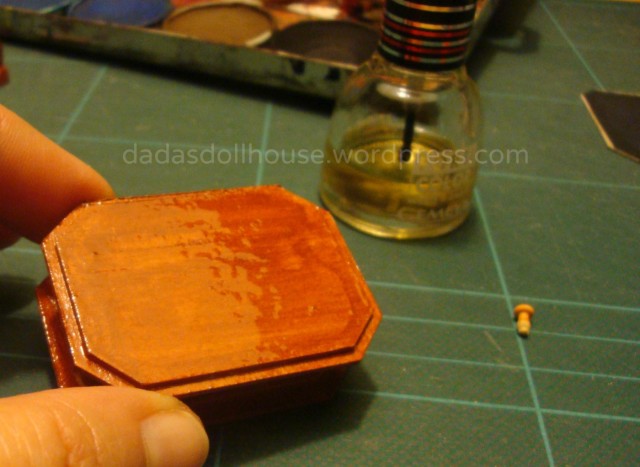
L’effetto che volevamo era lucido, vetrificato, così, una volta asciutto il colore, abbiamo steso un paio di mani di smalto per unghie trasparente.
We wanted a glossy, glazed effect. So, once the color was dry, we applied two coats of clear nail polish.

Abbiamo colorato anche tutto l’esterno del cassettino. Mentre la vernicetta lucida l’abbiamo messa solo sul frontale.
We painted the outside of the drawer with the same colors. But we applied the varnish only on the front panel.
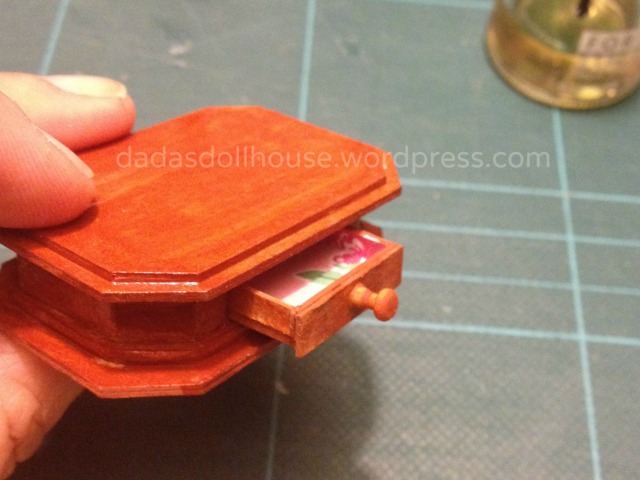
Questo accorgimento serve a fare in modo che il cassetto scivoli più facilmente. Infatti, lo smalto potrebbe creare attrito o ispessire troppo i bordi.
This is to make sure that the drawer slides easily, as the varnish may create friction or thicken the borders.

Una volta asciutti tutti i pezzi, abbiamo incollato i vari strati che compongono lo specchio e la sua cornice.
Once the varnish was dry, we glued the various layers that make up the mirror and its frame.

Poi abbiamo applicato tutto attorno al bordo una strisciolina di cartoncino semplice, dello stesso colore.
Then we applied all around the border a thin strip of cardboard in the same color.

Ora il bordo ha un aspetto compatto e ben rifinito.
Now the border looks compact and well finished.

La specchiera aveva bisogno ancora di qualche ritocco. Abbiamo quindi colorato lo spessore della strisiolina di cartoncino per renderlo omogeneo con il resto della cornice. Infine abbiamo verniciato con lo smalto lucido il bordo appena incollato.
Now the mirror needed some retouching. We colored the side of the cardboard strip in order to make it look the same as the rest of the frame. Then we applied the glossy nail polish to the border that we had just glued.
 Avendo deciso di usare degli spilli con la capocchia nera come perni, abbiamo voluto riprendere il colore ed abbiamo dipinto con un pennarello indelebile nero il pomello del cassettino.
Having decided to use as pivots two pins with a black pinheads, we decided to paint the knob of the drawer with a black permanent marker.
 I perni devono essere fissati esattamente a metà del fianco dello specchio. Un leggero spostamento renderebbe impossibile mantenere lo specchio in posizione verticale.
Il vantaggio di lavorare con il cartoncino è che gli spilli entrano nella cornice senza fatica.
The pins must be attached exactly in the middle of the mirror’s side. Even a slight change of position would make it impossible to keep the mirror in the vertical position.
The advantage of working with cartonboard is that the pins enter effortlessly into the frame.

Per essere sicure di fissare i perni alla stessa altezza, ci siamo aiutate con le righe disegnate sul tappetino da taglio.
To be sure to fix the pins at the same height, we used the lines drawn on the cutting mat as guidelines.

Anche il punto nel quale praticare il foro nella colonnina è importante. Infatti lo specchio deve poter oscillare liberamente senza toccare la base.
Per ottenere l’altezza giusta del perno, abbiamo lasciato lo specchio con i due spilli puntati sdraiato sul tappetino. A 2 mm dal lato corto dello specchio abbiamo sistemato un righello per simulare il piano sul quale poggia la colonnina. Poi abbiamo posizionato la colonna a fianco dello specchio, facendo toccare la sua base contro il righello. Con un pennarello abbiamo segnato il punto dove arriva lo spillo e dove quindi avremmo dovuto praticare il foro nel legno. Con un piccolo trapano a mano da modellismo abbiamo forato la prima colonnina.
La stessa altezza andava riportata poi sulla seconda colonnina. Così abbiamo messo le due colonnine in piedi, una a fianco all’altra e, con la punta del trapano ancora infilata nella prima, abbiamo forato la seconda, tenendo il trapano parallelo al piano. (vedi foto in alto) Dopo aver intaccato la seconda colonnina, abbiamo tolto la prima colonna ed abbiamo proseguito a forare completamente anche la seconda.
It is also important to determine where to drill the hole in the column. In fact, the mirror must be able to swing without touching the base.
To get the right height of the pivot, we left the mirror with the two pins lying on the cutting mat. At a distance of 2 mm from the short side of the mirror we placed a ruler to simulate the countertop on which the columns should stay. Then we placed one column beside the mirror, the plinth touching the ruler. We marked on the column, the point where the pin arrives and where we had to drill the hole in the wood. We used then a small hand drill for model building to pierce the first column.
The same height had to be marked also on the second column. To do so we put the two columns upright one next to the other. With the drill bit still inserted in the first column and keeping the drill parallel to the table, we pierced the second column. (please see picture above) We just notched it. Then we removed the first column from the drill bit and we continued to perforate completely the second pillar.
 Naturalmente gli spilli sono troppo lunghi e devono essere accorciati. Con un semplice tronchese da bigiotteria, abbiamo eliminato la parte eccedente.
Lo spillo è piuttosto duro da tagliare, ma basta intaccare il metallo con il tronchese e poi piegare con le dita lo spillo ed esso si spezza nel punto desiderato. Fate attenzione però a non pungervi!
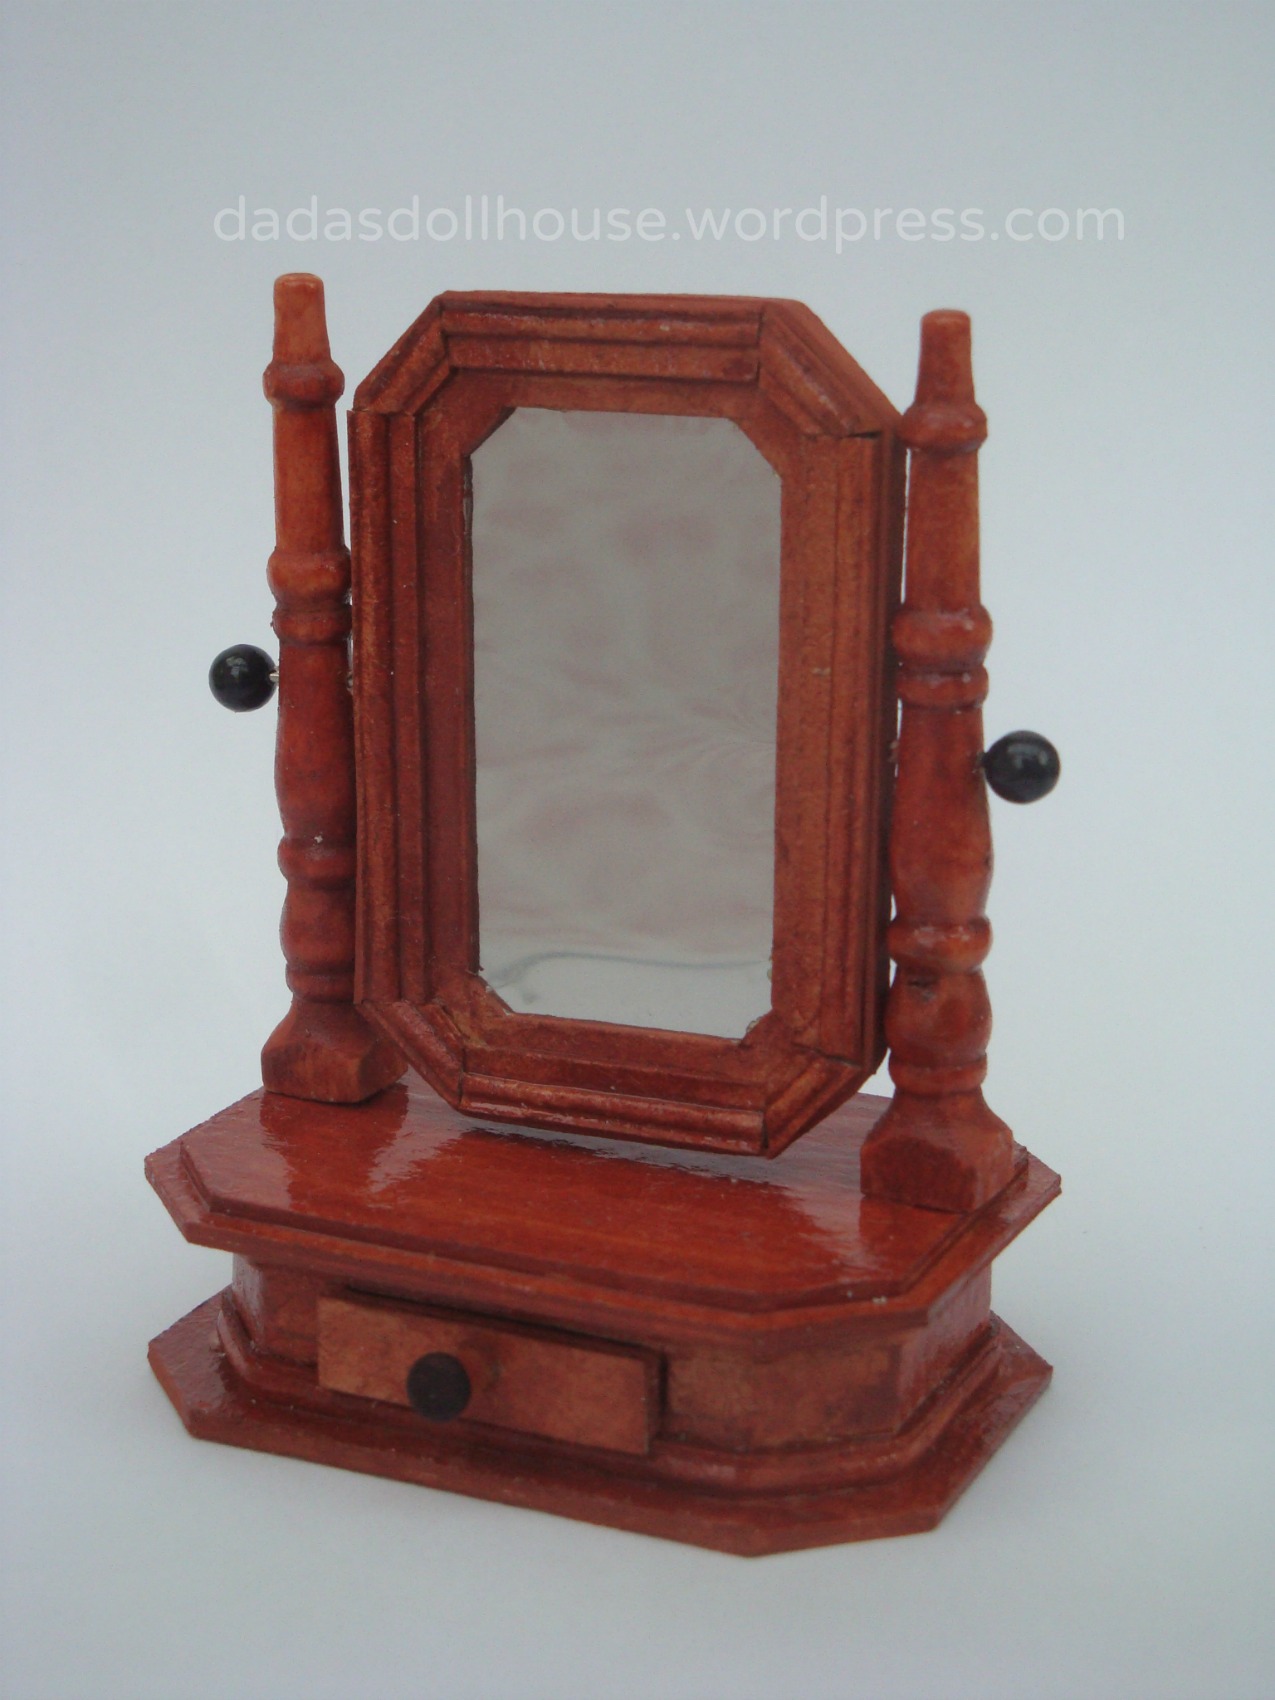
Qui di seguito qualche foto della nostra specchiera finita. Non avremmo mai immaginato che con del cartoncino e degli acquerelli si potesse ottenere un risultato così realistico. Siamo molto soddisfatte!
Of course, the pins are too long and must be shortened. With the wire clippers we cut off the excess.
The pin is pretty hard to cut. If you just dent the metal with the wire cutter and then carefully bend the needle with your fingers, it will break. Be careful however not to prick yourself!
Below some pictures of our finished shaving mirror. We had never imagined that we could get such a realistic result just with cardboard and watercolors. We are really satisfied!


La realizzazione di questo specchio da comò ci ha ispirate. Abbiamo quindi deciso di creare per il nostro salotto una specchiera da camino in stile Impero.
Vi diamo quindi appuntamento al prossimo post!
The making of this shaving mirror has inspired us. Therefore we have decided to create an Empire overmantle mirror for the fireplace in our living room.
So meet you soon!


Precioso
"Mi piace""Mi piace"
Gracias! 🙂
"Mi piace""Mi piace"
Beau travail ! Ça donne envie d’utiliser le carton. Mais il faut être très soigneux au niveau des découpes car c’est plus difficile à poncer que le bois.
"Mi piace""Mi piace"
Merci Joc! La raison pour laquelle je préfère utiliser le papier et le carton, c’est qu’ils sont faciles à travailler et on n’a pas besoin d’équipements spéciaux. Donc je suis sure que tu n’auriez pas des problèmes! 😉 Et puis c’est un matériau pauvre et si on fait une erreur, on peut refaire 🙂
"Mi piace""Mi piace"
Lavoro bellissimo ❤
Ciao
Sid
"Mi piace""Mi piace"
Grazie Sid! 🙂
"Mi piace""Mi piace"
Bellissimo! Ma credo che avrei tolto le capocchie degli spilli.
"Mi piace""Mi piace"
Grazie Fabiola! Si potrebbero usare spilli con capocchie più piccole, ma a me pare che i due pomelli neri, ripresi da quello del cassetto, diano carattere alla specchiera. 🙂
"Mi piace""Mi piace"
Your little mirror looks wonderful.
I will try it.
Kiss to you
Sonja
"Mi piace""Mi piace"
Danke Sonja! Es freut mich, dass dir mein Rasierspiegel gefällt und du ihn ausprobieren möchtest. Es würde mich wirklich freuen deine Version zu sehen 😉
Kuss auch von mir
Ersilia
"Mi piace""Mi piace"
Ciao Ersilia, gran bel lavoro!
in particolare trovo interessanti le modanature realizzate in cartoncino, l’effetto é realistico ed elegante.
Per realizzare lo specchio potreste provare a riciclare l’interno della carta delle uova di pasqua, sormontato da un pezzetto di plastica trasparente
Un saluto,
Alessandra
"Mi piace""Mi piace"
Grazie Alessandra per il suggerimento. La specchiera per il camino, che vi mostreremo nel prossimo post, è stata fatta aggiungendo il “vetro”. Ho paura invece che la carta argentata non sia sufficientemente a specchio. Leggevo in qualche forum che esiste uno specchio in materiale sintetico che si può tagliare con le forbici. Devo vedere se si trova anche da noi in Italia. In ogni caso vi terrò informati.
Un saluto anche a te
"Mi piace""Mi piace"
Complimenti! Sei veramente brava e come ho già detto generosa a dividere con noi i tuoi lavori. Grazie.
"Mi piace""Mi piace"
Grazie Monica, sei sempre gentile 🙂
"Mi piace""Mi piace"
Pingback: La caminera – The overmantel mirror | Dada's dollhouse
Pingback: Le orchidee in vaso – Potted orchids | Dada's dollhouse
Pingback: L’abbaino – The dormer | Dada's dollhouse