

Con lentezza ho ripreso a lavorare alla struttura della casetta. Ormai mi è chiaro, che sarebbe meglio smontarla e riassemblarla per poter ottenere un risultato accettabile, ma il legno è troppo fragile e rischierei di rovinare tutto. Così continuo con la costruzione cercando di fare il meglio possibile.
Finiti di montare pareti, facciata parte 1, parte 2, parte 3, parte 4 e tetto posteriore, il passaggio successivo sarebbe quello di fissare la parte anteriore del tetto. Purtroppo ho letto troppo tardi su altri blog, che sarebbe stato meglio realizzare il tetto in un pezzo unico, anziché usare i tre forniti con i fascicoli. Ma ho già applicato le tegole, montato gli abbaini ed applicato le carte da parati, preferisco quindi trovare una soluzione alternativa.
Per poter ragionare sul modo migliore di procedere, ho provato ad appoggiare i tre pezzi sopra la casa. Subito ho avuto l’impressione che mancasse qualcosa. Il tetto non è sporgente ed arriva a filo della facciata.
Slowly I started to work again on the dollhouse’s structure. At this point it’s clear to me, that it would be better to take it apart and reassemble it again, in order to obtain an acceptable result. But the wood is really fragile and I would risk to ruin everything. So I go on with the construction trying to do the best I can.
Once the walls, facade part 1, part 2, part 3, part 4 and rear roof were finished, the next step would be to attach the front roof. Unfortunately I read too late on other blogs, that it would be better to make the roof in one piece, rather than using the three pieces that came with the issues. But I have already mounted the dormers, applied the shingles and the wallpapers, so I prefer to find an alternative solution.
In order to think about the best way to proceed, I placed the three pieces on top of the house. Immediately I had the impression that something was missing. The roof was not protruding and it was flush with the façade.

Palazzo Spinola a Milano – storiadimilano.it
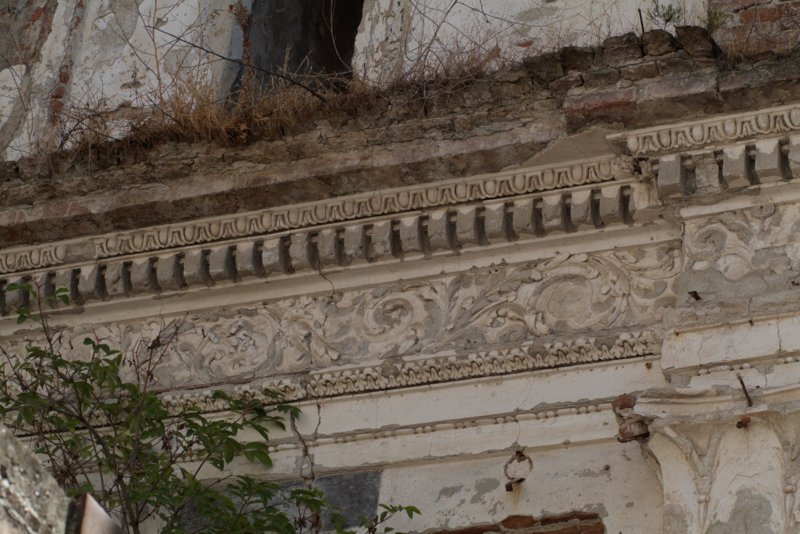
La maggior parte degli edifici storici, in Italia, hanno un cornicione che rifinisce la parte alta della facciata. Si tratta di un elemento architettonico che corre orizzontalmente lungo tutto il muro e che sporge rispetto alla parete sottostante.
In Italy, most of the historic buildings have a cornice or eaves that finish the upper part of the facade. This is an architectural element that runs horizontally along the entire wall and protrudes from the surface below.

via Restauro & Conservazione

via Restauro & Conservazione
via Restauro & Conservazione
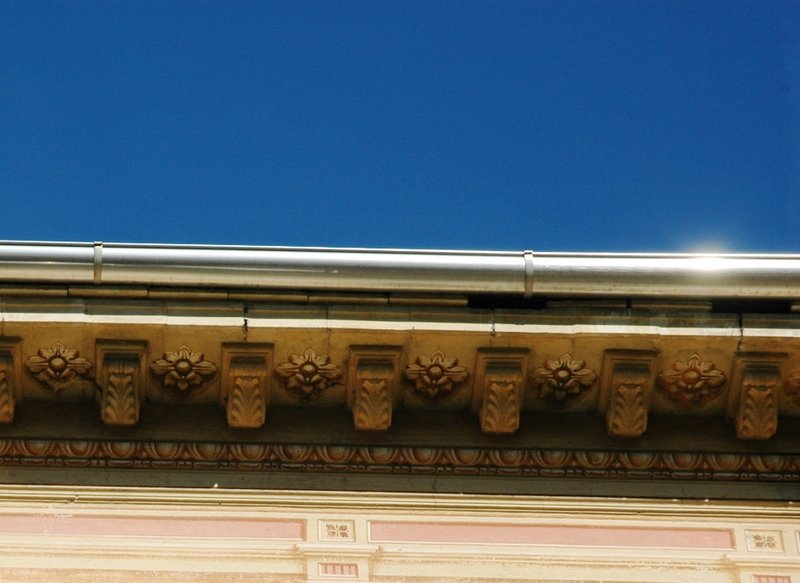
Spesso il cornicione è sorretto da mensole, che possono essere di semplice legno, di mattoni o di pietra lavorata che riprende altri elementi decorativi della facciata.
Often the cornice is supported by corbels, which can be made of simple wood, bricks or carved stone matching with other decorative elements of the façade.
via restauro & Conservazione
Le prime cornici in pietra a coronamento della facciata risalgono all’epoca degli antichi Egizi. Più tardi nell’architettura greca questo elemento costruttivo venne codificato. In epoca romana assunse poi un’importanza estetica.
The first stone cornices crowning the façade date back to the ancient Egypt. Later in Greek architecture this constructive element was codified. Then in ancient Roman times it assumed an aesthetic importance.

Palazzo Medici, Firenze 1444 – 1460
Gli edifici medievali, ma soprattutto quelli costruiti nel periodo che va dal Rinascimento fino all’Ottocento, presentano cornicioni importanti che sottolineano lo stile monumentale molto apprezzato in queste epoche.
Possono avere dimensioni notevoli, come quello di Palazzo Medici a Firenze, progettato da Michelozzo, che è alto 3 m su un’altezza della facciata di 25 m.
Medieval buildings, but especially those built during the period from the Renaissance up to the nineteenth century, have important cornices that underline the much appreciated monumental style.
They can be of considerable size, like that of Palazzo Medici in Florence, designed by Michelozzo, which is 3 m high on a 25 m height facade.
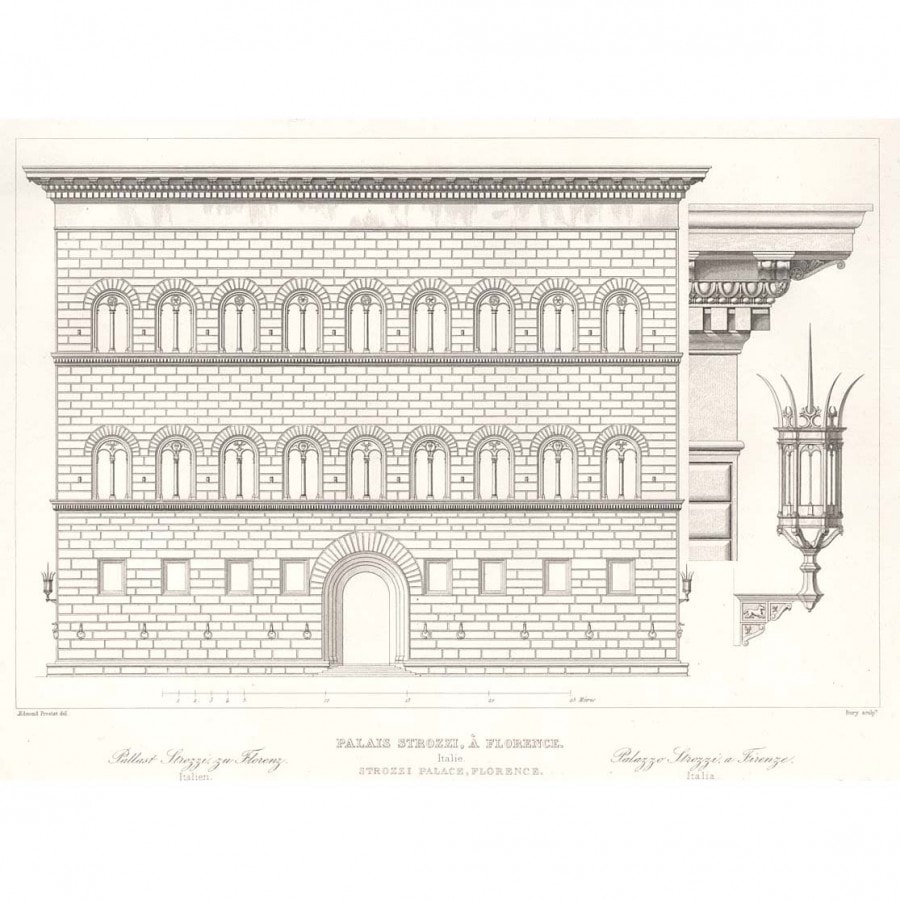
Palazzo Strzzi, Firenze 1489 – 1538
Anche l’aggetto può essere portato agli estremi, come per Palazzo Strozzi a Firenze, realizzato dagli architetti Benedetto da Maiano, Simone del Pollaiolo e Baccio d’Agnolo. Questo cornicione sporge per ben 2,15 m!
Even the overhang can be taken to extremes, as for Palazzo Strozzi in Florence, built by the architects Benedetto da Maiano, Simone del Pollaiolo and Baccio d’Agnolo. This cornice protrudes about 2.15 m!

Palazzo Farnese, Roma 1541 – 1580
Oppure possono essere riccamente decorati, come lo splendido cornicione di Palazzo Farnese a Roma, opera di Michelangelo.
Or they can be richly decorated, like the splendid cornice of Palazzo Farnese in Rome, by Michelangelo.

cornice details by Marc Levoy
Il cornicione non ha solo una funzione costruttiva o decorativa, ma anche una valenza funzionale. Infatti, questo elemento architettonico sporgendo fa cadere l’acqua piovana lontano dalla facciata, proteggendo il muro sottostante. Inoltre ripara dal sole l’ultimo piano, quello più esposto al calore.
Ho quindi deciso di costruire anch’io un cornicione, che oltre a rendere l’aspetto della facciata più realistico, mi aiuterà a tenere meglio insieme la facciata. Come forse ricorderete, le ante della casetta erano originariamente 6 pezzi separati e noi poi li avevamo uniti e creando due ante.
The cornice not only has a constructive or decorative function, but it has also a functional value. In fact, this projecting architectural element throws the rainwater away from the facade, protecting the wall below. It also shades the top floor from the sun, as this is the most exposed to heat.
So I decided to build a cornice, too. It will not only make the house look more realistic, but it will also help to keep the façade together. As you may remember the doors of the dollhouse were originally made of six separated pieces and we put them together and built two doors.

Ho iniziato con il realizzare le mensole che reggeranno il cornicione. Mi piaceva l’idea di farle di legno, così ho utilizzato la parte finale delle mollette dei panni, quella più spessa, tagliandone un’estremità lunga 15 mm.
I started making the corbels that will hold the cornice. I liked the idea of making them of wood. So I used the final part of the clothespins, the thick one, cutting off an end, 15 mm long.

Poi li ho fatti aderire ad un nastro adesivo di carta per poterli dipingere più facilmente.
Then I made them stick to a paper tape, so it was easier to paint them.

Ho preso dell’anilina all’acqua ed ho dipinto color noce tutte le parti visibili delle mensole .
I took a water soluble aniline and dyed all the visible parts of the corbels with a walnut stain.

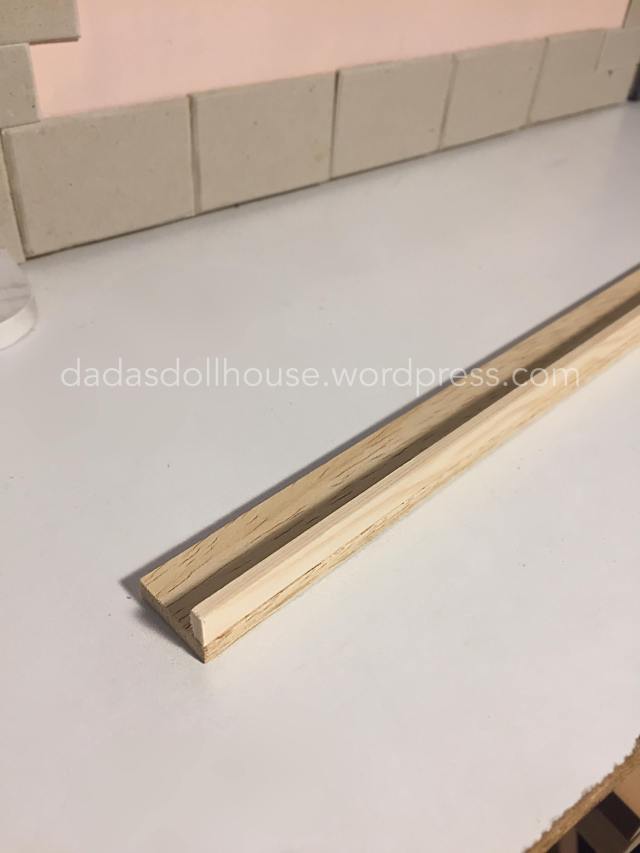
Mentre i pezzi si asciugavano, ho tagliato una listello di legno rettangolare da 20 mm x 5 mm, ricavandone due pezzi ognuno lungo quanto l’anta della facciata sulla quale verrà incollata, ovvero una di 33,5 cm e l’altra di 45,5 cm.
While the pieces dried out, I cut a rectangular wooden strip, 20 mm x 5 mm, in two pieces. Each is as long as the door of the façade on which it will be glued. Mine measure 33,5 cm and 45,5 cm.
Ho preso poi un listello da 8 mm x 2 mm ed ho realizzato il cordolo di contenimento del cornicione, tagliandone due pezzi anch’essi lunghi uno di 33,5 cm e l’altro di 45,5 cm. Poi li ho incollati formando una “L”.
Infine ho dipinto questi pezzi dello stesso colore della facciata.
Then I took a wooden strip measuring 8 mm x 2 mm and I made the cornice’s containment curb, cutting two long pieces the same size as the other strips, 33,5 cm and 45,5 cm long. Then I glued them to an “L”.
At last, I painted these pieces the same color as the facade.

Ho incollato le mensole sulla parte sottostante dell’elemento a “L”. Le ho sistemate a distanze regolari, distribuendole lungo tutta la lunghezza della facciata, così che con le ante chiuse l’effetto sia di un cornicione unico. Le mie distano 8 cm una dall’altra.
Le mensole devono essere applicate a filo della stecca, sul lato che va applicato al muro, così da non creare spessori che renderebbero molto difficile incollare il cornicione alla facciata.
Una volta asciutto il tutto, ho steso la colla vinilica sul retro del cornicione e delle mensole e l’ho fatto aderire sul muro, a filo delle due facciate.
I glued the corbels on the underside of the “L” element. I arranged them at regular distances, distributing them along the entire length of the façade, so that when the doors are closed the cornice appears be as a single piece. Mine are 8 cm apart from each other.
The corbels must be applied flush with the rear side of the cornice. So when the piece is glued to the wall, there is no protrusion that may prevent the cornice from properly adhere to the façade.
Once everything was dry, I spread the vinyl glue on the back of the cornice and of all the corbels and glued the cornice to the wall, flush with the upper sides of the dollhouse’s doors.

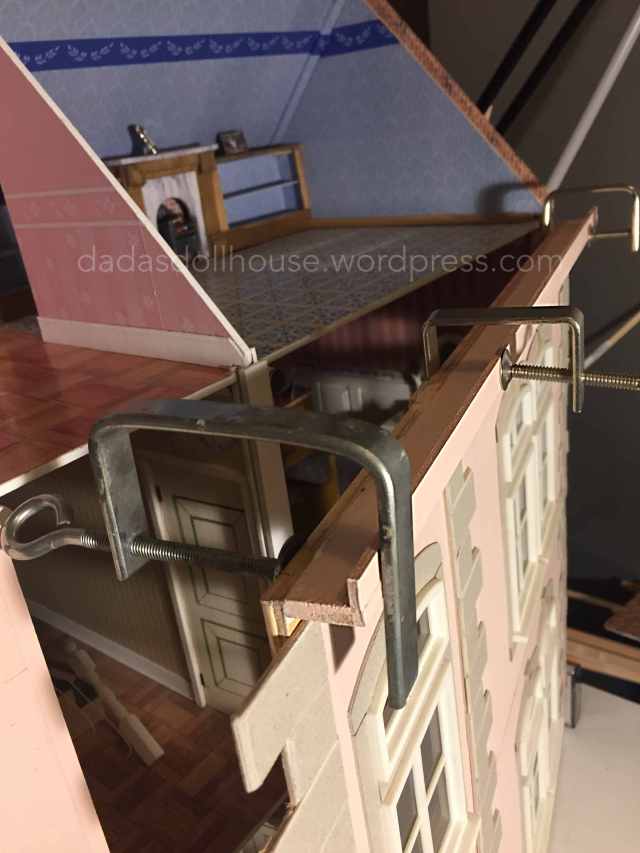
Con alcuni morsetti ho tenuto bloccato il cornicione contro la facciata ed ho lasciato asciugare una notte intera.
Ho usato del semplice Vinavil. E’ una colla vinilica che mi piace molto perché è perfetta per il legno sul quale ha forza d’incollaggio molto forte, tanto da essere usata abitualmente da falegnami e restauratori. Ha un costo basso e può essere usata con ottimi risultati anche su carta, cartone, pelle, tessuti e polistirolo. Non è tossica ed è facile da usare. Necessita però di tempi lunghi di asciugatura, dalle 12 alle 24 ore a secondo delle condizioni ambientali. I pezzi incollati vanno lasciati asciugare sotto dei pesi o stretti da morsetti.
Using some clamps I held each cornice against its door and let everything dry overnight.
I used simple Vinavil. I like this vinyl glue very much, because it’s perfect for wood as it provides strong bonds. Therefore it’s regularly used by carpenters and restorers. It has a low cost and can also be used with good results on paper, cardboard, leather, fabrics and polystyrene. It isn’t toxic and is easy to use. However, it requires long drying times, from 12 up to 24 hours, depending on the weather conditions. The glued pieces should be let to dry under weights or tightened by clamps.
Anche se la colla vinilica, una volta asciutta, diventa trasparente, ho eliminato subito l’eccesso con un panno umido, così da evitare antiestetici rigonfiamenti.
Even if vinyl glue, once dry it turns clear, I immediately eliminated the excess with a wet cloth, in order to avoid unsightly hardened blobs.

I morsetti che ho usato lasciano segni. E’ quindi opportuno mettere tra il metallo ed il cornicione e l’interno dell’anta degli spessori, come del cartoncino o del legno, cosa che io purtroppo mi sono dimenticata di fare.
To prevent the clamps from leaving marks on the cornice, it is advisable to put a piece of wood or cardboard between the metal and the cornice and the inner part of the door. Unfortunately I forgot to do it.

L’effetto della prima parte di cornicione in posizione è già molto soddisfacente.
The effect of the first part of the cornice in position is already very satisfactory.

Applicati tutti e due i pezzi del cornicione, ho voluto sistemare nuovamente il tetto, anche se in modo posticcio, sulla casa per valutare l’impatto complessivo di quest’ultimo intervento. A me piace l’impatto visivo. Voi cose ne pensate?
After having applied both the cornice pieces, I placed the roof again on the house to evaluate the overall impact of this last intervention. I’m pleased with the visual impact. What do you think about it?

SalvaSalva


Bella facciata. Io devo fare le tegole ma non prendo mai il verso, sono troppe!
"Mi piace"Piace a 1 persona
Grazie! 😊 Non devi pensare a quante sono, ma farne un po’ alla volta…. poi senza accorgerti ti trovi una mega produzione 😉
"Mi piace""Mi piace"
I think that the new corbels and their cornice overhang were the Perfect Up-Grade and your finished results add to the overall Authenticity of the building.
AND I especially like how you used the wooden clothes pegs to fashion the corbels which was not only a good idea but a cost effective solution as well! 😀
"Mi piace"Piace a 1 persona
Thank you Elizabeth! I’m happy you liked the cornice 😊 Looking for new uses for everyday items is part of the fun, isn’t it? 😉
Hugs
Ersilia
"Mi piace""Mi piace"
Wow 😍
Il lavoro procede alla grande! Azzeccata la soluzione cornicione, dona alla facciata eleganza e completezza 😄
Bacio
Sid
"Mi piace"Piace a 1 persona
Grazie Sid! Il tuo commento m’incoraggia a continuare con i lavori alla struttura. Spero di postare presto qualche progresso.
Baci anche a te 😊
"Mi piace""Mi piace"
Attendo con pazienza e curiosità i tuoi aggiornamenti 😀
Bacio
Sid
"Mi piace"Piace a 1 persona
Ersillia, you are a genius! I like the idea that your house will end up with an Italian flavour, and that you were able to solve some of the structural problems this way. Looking forward to seeing how you progress.
My house is stalled at the moment. With winter fast approaching here in South Africa, we undertook a big project building a warming cupboard to house one of my other collections, and I’m busy painting the interior of my studio, which desperately needed it. But I will post about the house again soon!
"Mi piace"Piace a 1 persona
Thank you Megan 😊 but … a genius 😳 I think you are exaggerating 😂😂😂 I hope I will not disappoint you with the finishing of the roof. It’s challenging and I continued to postpone it.
You have a lot to do, sonmany houses in all sizes, but wintertime should be a good period for making miniatures. I’ll patiently wait for your next post 😊
"Mi piace""Mi piace"
Il cornicione è decisamente un’ottima scelta, rende tutto più solido e completo e dona credibilità alla casa, togliendole quella sensazione di “scatoletta”. Bello anche l’escursus sulla storia del cornicione, molto interessante!
"Mi piace"Piace a 1 persona
Grazie Ele! Sono contenta che l’aggiunta del cornicione ti piaccia e che tu abbia trovato interessanti le informazioni su questo elemento architettonico, che spesso passa inosservato
"Mi piace""Mi piace"
Sono contenta che non stai smontando la casetta e che hai trovato una buona soluzione. Ogni tuo post sono una piccola lezione di architettura. Complimenti.
"Mi piace""Mi piace"
Scusa Maria Rosaria, il tuo commenti mi era sfuggito… Grazie per i complimenti!
"Mi piace""Mi piace"
Gute Lösung, vor allem wenn die Dachkonstruktion bündig schließt! Ich habe was ähnliches geplant. allerdings mit einer breiteren Zierleiste aus Holz (im Baumarkt gekauft).
Schön, dass du wieder am Bauen bist. Mein Haus hat Sommerpause, der Garten beansprucht meine ganze Freizeit aber bald geht’s wieder los mit dem Dach… schon praktisch, wenn man sich an deiner Arbeit orientieren kann. Die Idee mit den Wäscheklammern finde ich übrigens genial!
LG, Marina
"Mi piace"Piace a 1 persona
Danke Marina und entschuldige bitte, wenn ich dir erst jetzt antworte. Irgendwie habe ich keine Meldung bekommen. 😕
Es freut mich, dass dir meine Lösung gefallen hat. Ich werde wahrscheinlich auch nicht mehr viel basteln, denn
bei schönem Wetter haben meine Terrassen den Vorrang. 😉 Außerdem ist es in meiner winzig kleinen Werkstatt sehr heiss.
Ich bin gespannt zu sehen wie es bei dir weiter gehen wird. In der Zwischenzeit wünsche ich dir einen schönen Sommer ❤️
"Mi piace""Mi piace"